Have you ever found yourself a bit stuck when trying to draw ears, perhaps feeling that they just do not quite look right on your characters or portraits? You are certainly not alone in that experience, as many people find this particular part of the head a rather tricky shape to get down on paper. It is, in a way, one of those features that can really make or break how believable your artistic creations appear, so getting it right feels pretty important, you know? This guide is here to offer some helpful pointers and simple approaches to make the whole process feel much less like a struggle.
We often think of ears as these rather complex, somewhat twisty bits of anatomy, and honestly, they can be. Yet, with just a little bit of guidance and a few straightforward steps, drawing them can become something you actually look forward to. There are some basic shapes and forms that, once you get the hang of them, will really open up your ability to make ears look natural and fitting for whatever person or creature you are bringing to life with your pencil or crayon. It is, basically, about breaking things down into smaller, more manageable pieces.
This resource is here to walk you through some easy-to-follow methods that can truly make a difference in your ear drawing attempts. We will look at how you can start with very simple shapes and gradually build up to something that has a lot more life and dimension. It is about building confidence in your hand and eye, so you can feel good about every line you put down. You will find that, with a bit of practice, those once-difficult ears will start to appear on your pages with a pleasing sense of ease, which is really something to look forward to.
- Daniel Boone Regional Library
- Setas De Sevilla
- Tuff Sheds
- Safe Haven Security
- Sheepshead Bay Regal Cinema
Table of Contents
- Why is Ear Drawing So Tricky?
- Getting Started with Ear Drawing - Simple Shapes
- Building Up Your Ear Drawing - Adding Depth
- Understanding the Parts of an Ear Drawing
- Making Your Ear Drawing Look Real
- Different Views for Your Ear Drawing
- Beyond Human Ear Drawing - Other Kinds of Ears
- Adding Color to Your Ear Drawing
Why is Ear Drawing So Tricky?
It is a common thought, isn't it, that ears are just one of those features that artists find a bit of a challenge to get right? You might wonder why something that seems so small on the side of a head can cause so much head-scratching. Well, in some respects, the human ear has this rather unique combination of gentle curves, subtle bumps, and little hollows that all fit together in a pretty specific way. It is not just a flat shape; it has a lot of interesting variations in how it comes forward and recedes, which can be a little hard to capture accurately on a flat sheet of paper. This is why many people, when they first start out, feel a bit lost when trying to make their ear drawing look just right.
The form of an ear, you see, is actually made up of several distinct parts that fold and overlap each other. This creates a kind of visual puzzle. If you just try to draw what you see without breaking it down, it can feel overwhelming, almost like trying to draw a crumpled piece of cloth without understanding its folds. This inherent structure, with its various layers and the way light and shadow play across them, is what gives the ear its distinct look, and also what makes it a somewhat interesting subject to put on paper. It is a bit like trying to capture a feeling, you know, rather than just a simple outline.
Then there is the issue of proportion. An ear needs to sit just so on the side of a head, not too big, not too small, and in the right spot relative to the eyes and nose. Getting that sense of balance and placement can be another hurdle. Plus, ears are not always seen straight on; they turn, they tilt, and they can be partially hidden by hair, which adds yet another layer of difficulty. All these elements combined contribute to why many aspiring artists find ear drawing to be a particularly intriguing, yet sometimes frustrating, aspect of portraiture. But honestly, it is all about having a system, which we will get to.
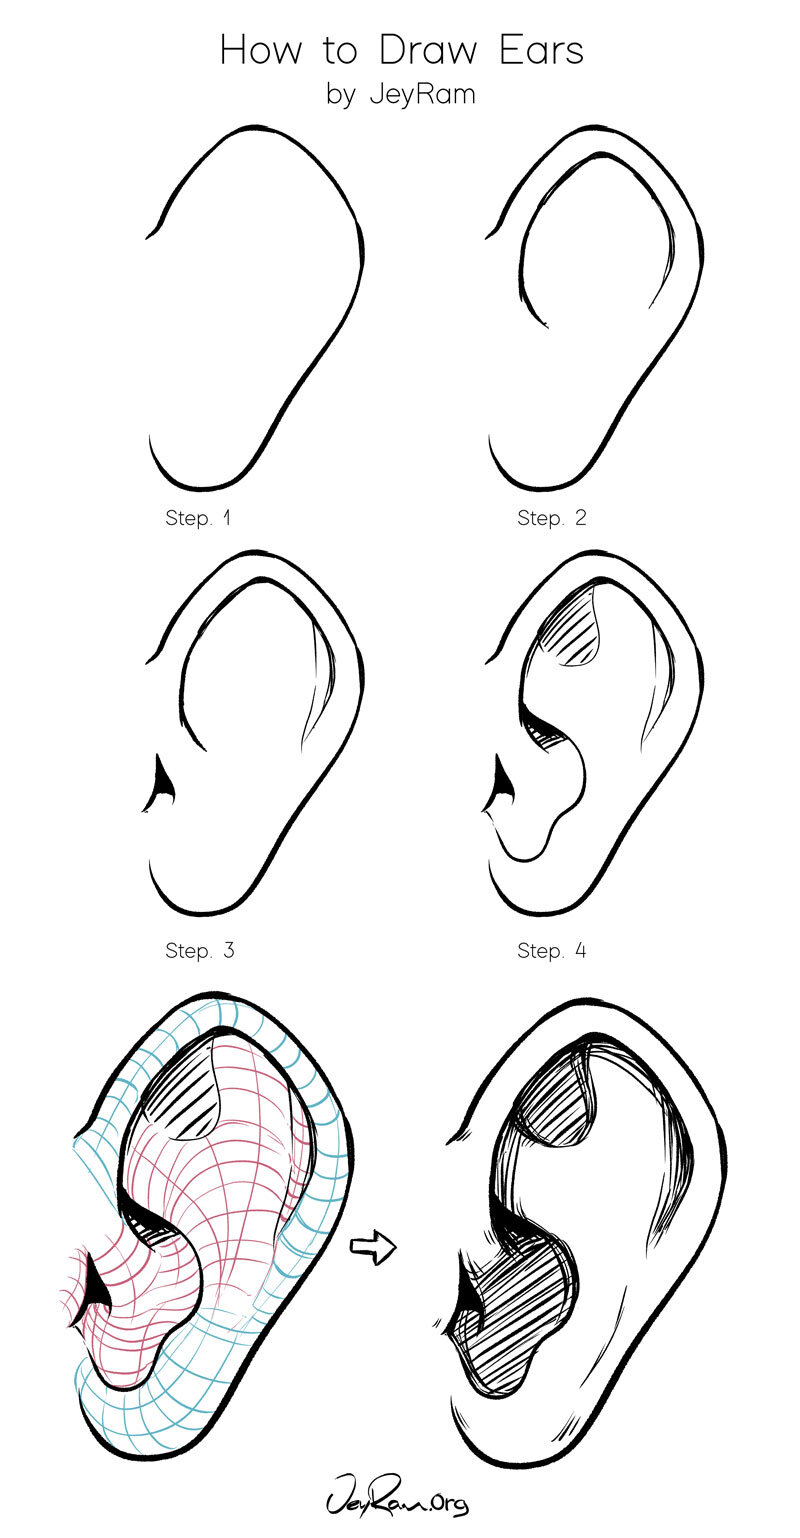
Getting Started with Ear Drawing - Simple Shapes
So, you are ready to give ear drawing a proper go, and the good news is, you do not have to start with anything too fancy or complicated. The simplest way to begin is by thinking about basic shapes. Forget about all those little bumps and folds for a moment. Just consider the overall form. What you will find is that an ear, at its very core, can be thought of as a couple of simple circles or perhaps an oval. This is a pretty common approach for many artists, and it really does help to lay down a good foundation for your ear drawing, in a way.
Imagine, if you will, drawing just two simple circles. One might be a little larger, forming the main part of the ear, and the other, slightly smaller, tucked inside or overlapping, to suggest the inner structure. This initial step is really just about getting the general placement and size right on your paper. It is not about perfection at this stage, but more about getting a rough idea of where the ear will sit and how much space it will take up. This basic framework is what you will build upon, so it is rather important to get it down first, you know?
Once you have those circles, or perhaps a rough oval shape, you can then begin to gently add a few curves. These curves are like the first hints of the ear's outer edge, what some might call the helix, and the initial suggestions of the inner folds. You are not trying to draw every single detail yet, just guiding your pencil to suggest the overall flow and direction of the ear's shape. This method makes the whole process feel much less overwhelming, allowing you to gradually bring the ear to life without feeling like you have to get every single line perfect right from the start. It is, basically, a very gentle way to approach your ear drawing.
Building Up Your Ear Drawing - Adding Depth
After you have those basic shapes and initial curves in place for your ear drawing, the next step is to begin giving it some real depth and dimension. This is where the magic of shading comes into play. Shading is not just about making things dark; it is about showing how light hits the ear and how certain parts recede into shadow, making the ear look like it is actually a three-dimensional object sitting on the side of a head, rather than just a flat outline. It is a pretty important step for making your ear look believable, you know?
Think about where the light source is coming from. Parts of the ear that catch the light will remain brighter, while areas that are tucked away or are facing away from the light will appear darker. This contrast between light and shadow is what creates the illusion of form and volume. You can use a pencil to gently build up layers of tone, starting with lighter applications and gradually adding more pressure or more layers to create darker areas. This layering approach is, in a way, very similar to how you might layer colors, but here you are layering shades of gray.
You will find that the ear has many little hollows and ridges, and each of these will have its own interplay of light and shadow. The outer rim, for example, might catch a lot of light, while the deeper parts of the ear canal or the folds within the ear will naturally be in more shadow. By paying attention to these subtle shifts in tone, you can really make your ear drawing pop off the page. It is about observing carefully and then translating what you see into varying degrees of darkness on your paper. This attention to light and form is what truly brings a sense of realism to your work, which is rather satisfying to see.
Understanding the Parts of an Ear Drawing
To truly create a compelling ear drawing, it helps a great deal to have a general idea of what makes up an ear. You do not need to be an expert in human anatomy, but knowing the main parts can guide your hand and help you understand why the ear looks the way it does. It is, basically, about breaking down the overall form into its simpler, more recognizable features. This makes the whole drawing process feel much more logical and less like you are just guessing where lines should go, which is pretty helpful.
One of the first things to consider is the outer rim, often called the helix. This is the curved edge that forms the ear's overall shape. Once you have that general outline established, you can begin to place the other features within it. There is also the antihelix, which is a ridge just inside the helix, often splitting into two upper branches. Then you have the concha, which is the deepest hollow of the ear, leading towards the ear canal. Knowing these major sections helps you to structure your ear drawing in a way that feels natural and proportionate.
Beyond these, there are smaller, but still important, parts like the tragus and antitragus, which are those little bumps near the ear opening, and the lobule, which is the earlobe. By understanding how these pieces fit together, you can create a more believable and structured ear. It is like assembling a puzzle; once you know where the main pieces go, the smaller ones fall into place more easily. This anatomical awareness, even at a basic level, really helps in creating a proportionate structure for your ear drawing, making it look much more convincing.
Making Your Ear Drawing Look Real
So, you want your ear drawing to look like a real ear, something that could actually be on someone's head? The trick here often comes down to simplifying the shapes you see and then building up the detail. It is a bit like how a sculptor might start with a big block of clay and gradually refine it. When you look at an ear, it can seem like a jumble of curves and shadows, but if you can simplify those into basic forms first, the rest becomes much more manageable. This approach makes the whole process feel less daunting, you know?
One very effective way to achieve this is to think of the ear not as a flat object, but as a series of planes and surfaces that turn in space. Some parts face forward, catching light, while others curve away, falling into shadow. By paying attention to these shifts in direction, you can suggest the three-dimensional quality of the ear. It is, basically, about seeing the ear as a form with depth, rather than just an outline. This kind of observation helps you to make decisions about where to put your lines and where to add your shading, which is pretty important for realism.
Another thing that helps a lot is to observe real ears. Look at how they sit on different people, how they vary in size and shape, and how light interacts with their surfaces. You will notice that no two ears are exactly alike, but they all share common structural elements. By simplifying these common elements into manageable shapes, you can then add the unique characteristics that make each ear distinct. This kind of thoughtful observation and simplification is what truly helps to bring a sense of life and authenticity to your ear drawing, making it look genuinely real.
Different Views for Your Ear Drawing
When you are working on your ear drawing, it is pretty common to start with a side view, as that is often the most straightforward angle. But people's heads, and their ears, are not always perfectly turned to the side. Sometimes you will see an ear from a slightly different angle, maybe a bit from the front, or perhaps more from the back. Each of these different views presents its own little challenges and interesting ways the ear's shape changes. It is, in a way, like learning to draw the same object from various perspectives, which is a valuable skill for any artist.
When an ear is seen from a more frontal angle, for instance, you might see less of the outer rim and more of the inner folds, and the ear might appear a little flatter or more compressed. If you are drawing an ear from behind, you will primarily see the back of the helix and the attachment to the head, with only hints of the inner structure peeking out. Each angle emphasizes different parts of the ear, and understanding these shifts is key to making your ear drawing look believable in any pose. It is about understanding how the ear's form behaves as it turns in space, which is really quite fascinating.
Practice drawing ears from these various angles. Try sketching them from a slight tilt upwards, or looking down on them. You will notice how the proportions seem to change, and how different parts become more or less prominent. This kind of practice helps to build your visual library and makes you more adaptable when drawing characters in different head positions. It is, basically, about becoming comfortable with the ear's three-dimensional nature, so you can confidently draw your ear drawing no matter the viewpoint, which is a pretty cool ability to have.
Beyond Human Ear Drawing - Other Kinds of Ears
While human ear drawing is a fantastic place to start and certainly offers a lot to learn, the world of ears does not stop there, does it? Think about all the different kinds of ears you see on animals, or even in fantasy creatures. There are long, floppy ears on a dog, pointed, upright ears on a cat, or perhaps even very large, expressive ears on an elephant. Each type has its own unique characteristics and challenges, but the basic principles of breaking down shapes and understanding form still apply, which is pretty neat.
When you venture into drawing animal ears, you will find that their anatomy, while different from human ears, still follows certain rules of structure and attachment to the head. A cat's ear, for example, is often triangular and can swivel to pick up sounds, while a rabbit's ear is long and thin, often with a slight curve. Understanding how these ears attach to the head and how they move can add a lot of life to your animal characters. It is, in some respects, about extending your ear drawing knowledge to new and exciting forms, which is a lot of fun.
And then there are fantasy ears! Elves might have long, graceful, pointed ears, while goblins could have small, leathery, or unusually shaped ones. Here, your imagination can really take flight, but it is still helpful to ground your designs in some understanding of how real ears work. Even a fantastical ear needs to look like it could function and belong on the creature's head. So, while you can create unique designs, remembering the core principles of form and attachment from your human ear drawing studies will help make your fantasy creations feel more believable, which is really quite a powerful tool.
Adding Color to Your Ear Drawing
Once you have got the form and shading down for your ear drawing, you might want to bring it even more to life by adding color. This is where things can get really interesting, as color can add another layer of realism and expression to your work. You might think of ears as being just one color, but if you look closely, you will see a whole range of subtle tones, especially when light hits them in different ways. It is, basically, about observing those subtle shifts and translating them into your chosen medium.
If you are using crayons, for example, a really effective way to add depth and make your ear drawing look pretty realistic is by layering colors. Instead of just using one shade of a skin tone, try building up the color with several different hues. You might start with a lighter base, then add slightly darker tones in the shadowed areas, perhaps even a touch of red or purple in the parts where blood vessels are closer to the surface, like the earlobe. This layering technique allows you to create a richer, more nuanced color that feels more alive than a single flat shade.
Think about how light interacts with the skin. Where the ear is exposed to light, the color might appear warmer and brighter. In the deeper shadows or folds, the color will be cooler and more muted. By carefully building up these layers of color, you can suggest the ear's unique textures and the way light plays across its intricate surface. It is, in a way, like painting with light and shadow, but with the added dimension of hue. This approach to coloring your ear drawing can truly make it look like a part of a living person, which is a very rewarding outcome.
Related Resources:


Detail Author:
- Name : Lenny Wisoky
- Username : xschamberger
- Email : aiden81@pfannerstill.com
- Birthdate : 2006-04-11
- Address : 5250 Kiehn Mill Suite 317 North Reymouth, VA 37931
- Phone : 1-740-707-6060
- Company : Emmerich-Hodkiewicz
- Job : Air Traffic Controller
- Bio : Nobis natus veritatis id eius excepturi modi aut. Itaque et ipsum eum perferendis velit quis quis est.
Socials
linkedin:
- url : https://linkedin.com/in/fermin.wilkinson
- username : fermin.wilkinson
- bio : Non suscipit eos id cumque beatae sequi a.
- followers : 4148
- following : 872
twitter:
- url : https://twitter.com/fermin_real
- username : fermin_real
- bio : Aspernatur exercitationem asperiores possimus eius velit qui corrupti. Vel numquam voluptas ut eius ullam ea. Ad aut et exercitationem quidem sit.
- followers : 4367
- following : 1300
instagram:
- url : https://instagram.com/fermin_wilkinson
- username : fermin_wilkinson
- bio : Et praesentium quaerat sit. Harum tempore nisi beatae. Laborum nostrum voluptatem qui tenetur.
- followers : 5988
- following : 1502
tiktok:
- url : https://tiktok.com/@fwilkinson
- username : fwilkinson
- bio : In placeat ut qui fugit nihil incidunt qui.
- followers : 2022
- following : 357
facebook:
- url : https://facebook.com/fermin4789
- username : fermin4789
- bio : Corporis atque voluptatem iusto.
- followers : 6226
- following : 2235
