Learning how to draw a bow can be a really fun way to add a little something special to your art, and it's easier than you might think, actually. Whether you are looking to sketch the kind of pretty bows that you see on presents, in someone's hair, or even on clothes, or perhaps you want to just doodle some bows in your notebook to capture that sweet, charming look, this skill is very accessible. You will find that putting bows into your drawings can give them a unique and personal feel, which is quite nice.
This guide is put together with beginners in mind, so there's no need to feel like you need a lot of prior experience to get started, you know? We will go through everything one step at a time, showing you how to create different kinds of bows. You will see how simple it is to add these shapes to whatever you are working on, whether it's for a school assignment, a personal art piece, or just for the pure joy of creating something new.
We're going to break down the entire process into easy-to-follow steps, so it's almost like having someone right there with you, guiding your hand. You will pick up some really neat ways to make your bow drawings look super appealing, whether you are aiming for something that appears quite real or something that just looks incredibly stylish and cool. So, let's get ready to make some beautiful bows on paper.
Table of Contents
- What Makes Drawing a Bow So Appealing?
- Getting Started - Your First Steps to How to Draw a Bow
- How Do You Start Drawing a Simple Bow?
- Making Your Fabric Bow Look Just Right - How to Draw a Bow
- What About Drawing a Traditional Bow?
- The Parts of a Classic Bow - How to Draw a Bow
- How Can You Make Your Bow Drawings Stand Out?
- Adding Those Special Touches to How to Draw a Bow
What Makes Drawing a Bow So Appealing?
There's something quite charming about a bow, isn't there? They show up in so many places, from tying up a thoughtful gift to decorating a hairstyle or even giving a little flourish to an outfit. This wide use means that knowing how to sketch them can really open up a lot of creative avenues for your artwork. It’s a very versatile little shape that can express many different feelings, depending on how you draw it.
For beginners, the shapes involved in a bow are pretty forgiving, which is nice. You don't need to be a master artist to make something that looks recognizable and sweet. The curves and loops are quite natural to form, and even if your lines aren't perfectly straight or your circles perfectly round, the overall impression of a bow usually comes through. This makes it a really good subject for anyone just beginning their drawing adventures, or for those who simply want to add a quick decorative element to their pages, you know?
Getting Started - Your First Steps to How to Draw a Bow
Before you put pencil to paper, it's good to have a little idea of what kind of bow you want to create. Are you thinking of a soft, flowing ribbon bow that might wrap around a present, or perhaps something more structured, like the kind you'd see in a classic archery setup? Both have their own unique charm, and both are completely doable for someone just starting out. Just getting a basic idea in your head can really help guide your hand as you begin, that's for sure.
You will want to make sure you have some basic drawing tools ready. A pencil, an eraser, and some paper are really all you need to get going. Don't worry about having fancy art supplies; the simpler, the better when you are learning a new shape. Sometimes, a simple sketch pad and a regular pencil are all you need to bring your ideas to life. It's about the practice, after all, not the price tag of your tools, so.
How Do You Start Drawing a Simple Bow?
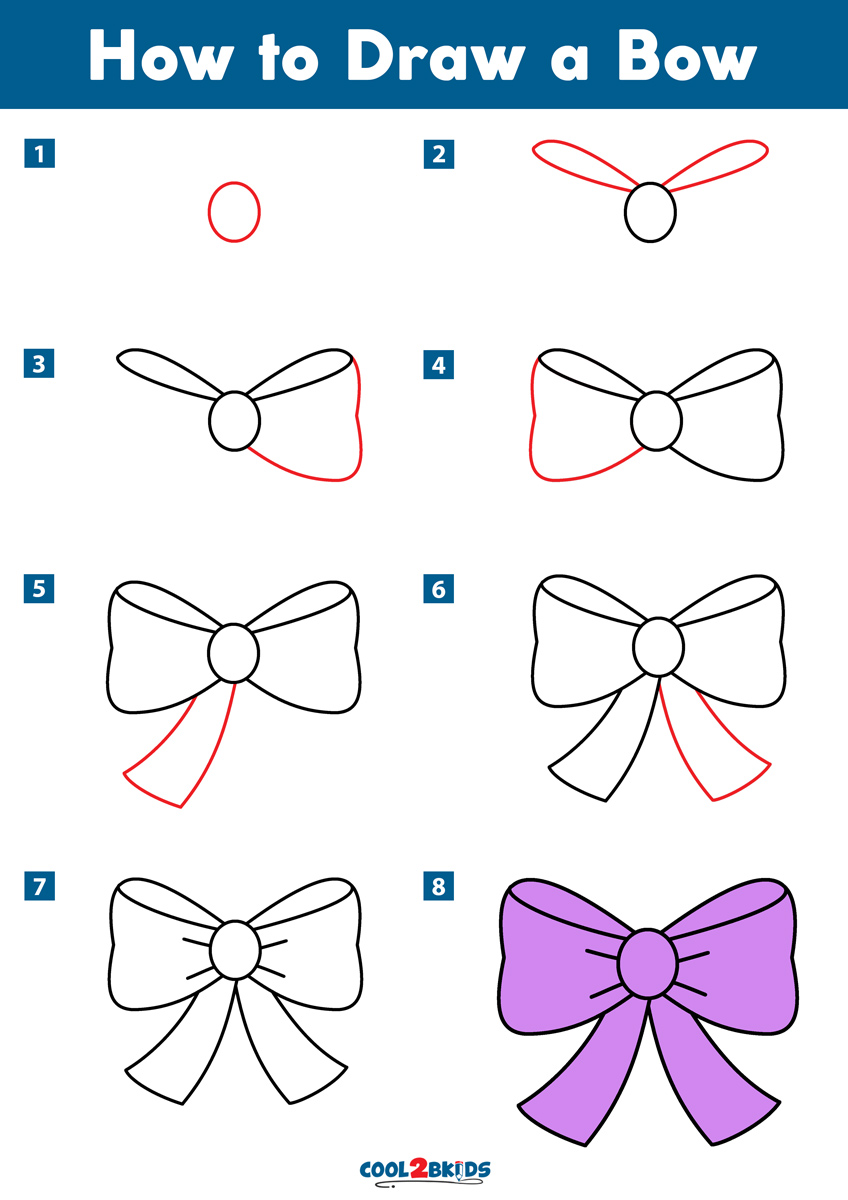
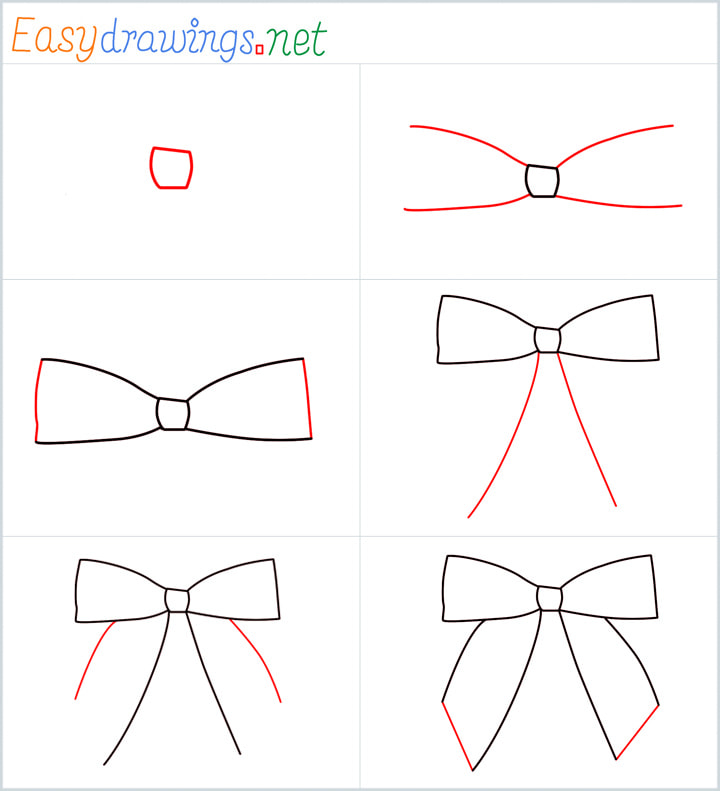
When you are looking to draw a basic, decorative bow, like the kind you might tie on a gift, you can start with a simple shape that acts as the center. Think of it like a small, flattened oval or even just a tiny rectangle. This will be the knot, or the part where all the ribbons come together. It's kind of the anchor point for the rest of your bow, in a way.
From that central point, you will want to draw two loops, one on each side. These loops are what give the bow its classic, puffy appearance. Make them somewhat rounded and full, like little clouds. Don't worry about making them perfectly symmetrical at first; a little imperfection can actually make your bow look more natural and charming. Just try to keep them relatively similar in size, that's all.
After you have your loops, you can add the "tails" of the bow. These are the pieces of ribbon that hang down from the central knot. You can make them long and flowing, or shorter and a bit curled, depending on the look you are going for. Sometimes, adding a little V-shape cut at the end of each tail can give it a more finished and polished look, which is pretty neat. Remember, the goal here is just to get the basic form down, so don't stress too much about every little detail right away.
Making Your Fabric Bow Look Just Right - How to Draw a Bow
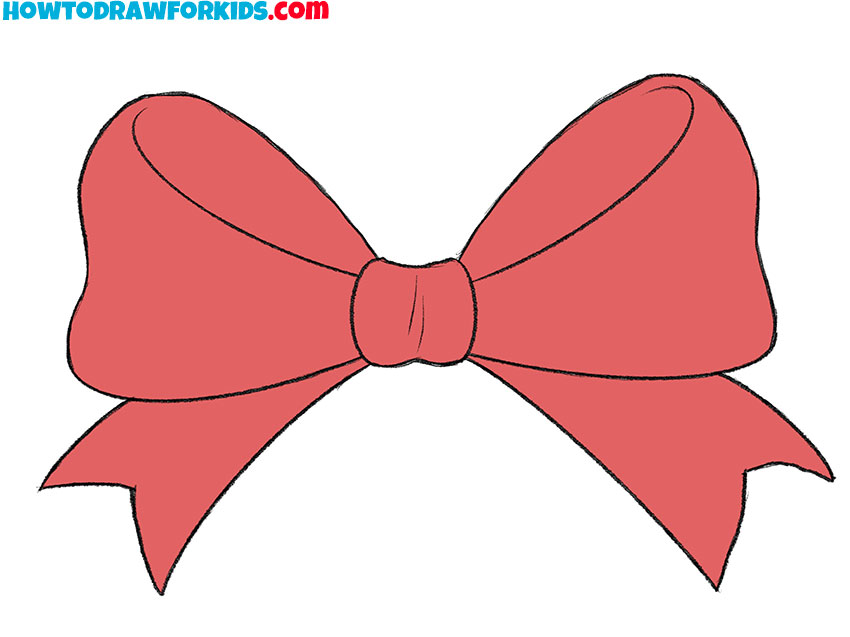
To make your fabric bow really seem like it's made of soft material, you can add some gentle curves and folds within the loops and tails. Ribbons aren't usually perfectly flat; they have a little bit of a ripple or a crinkle to them. So, adding some subtle lines inside the loops can suggest this texture and give your bow more depth. It's almost like you are drawing the way the light might catch the fabric, you know?
Think about how a real ribbon would behave. It might twist a little, or one side might be slightly shadowed. You can use lighter lines to show these softer folds and darker lines for the edges or where the ribbon overlaps itself. This kind of attention to how fabric behaves can really bring your bow drawing to life, making it seem much more realistic and inviting. It's a small detail, but it makes a big difference, very much so.
You can also experiment with different types of bows. There are simple single-loop bows, double-loop bows, or even more elaborate ones with multiple layers of ribbon. Once you have the basic idea of drawing the central knot, loops, and tails, you can start playing around with adding more loops or making them different sizes. This is where your own personal style can really start to shine through in your bow sketches.
What About Drawing a Traditional Bow?
Now, if you are thinking about drawing a traditional bow, like the kind used for archery, the approach is a little different from drawing a ribbon bow. This type of bow has a much more rigid structure and is designed for a specific purpose. It's about showing strength and tension, rather than softness and decoration. So, the lines you use will tend to be straighter and more defined, which is pretty important.
When you are drawing a traditional bow, you will want to focus on its long, curving shape. It's typically a single piece of material, often wood, that bends back when pulled. You might start by sketching a long, gentle curve that represents the main body of the bow. This curve should suggest power and the ability to spring back into place. It's a bit like drawing a spring that's just waiting to release its energy, in some respects.
The way a traditional bow is used also gives you some clues for drawing it. The source text mentions using your upper back and shoulder muscles to draw the bow, keeping your bow arm straight, and pulling with the other arm in one fluid motion towards your anchor point. While you won't be drawing a person shooting the bow, thinking about this action can help you understand the bow's form and how it might look when under tension. It helps you get a feel for its purpose, you know?
The Parts of a Classic Bow - How to Draw a Bow
A traditional bow, the kind used for shooting, usually has three main parts. There's the hilt, which is the part you hold onto. Then there are the shoulders, which are the two long, curved sections that extend from the hilt. And finally, there's the bowstring, a thin, strong line that connects the two ends of the shoulders. These are fairly simple elements, and you can certainly sketch them even if you are new to drawing.
To draw the hilt, think of a grip for a hand. It's often a slightly thicker or shaped section in the middle of the bow's length. You might make it a little wider than the rest of the bow, perhaps with a slight indentation where fingers would wrap around. This part needs to look sturdy and comfortable for someone to hold onto. It's the central point of control, so it should feel that way in your drawing, too.
The shoulders are the long, graceful curves that go from the hilt to the tips. They should look strong but also flexible, ready to bend. Make sure they taper slightly as they reach the ends, where the bowstring will attach. These are the parts that store all the energy when the bow is pulled back. Drawing them with a smooth, consistent curve is pretty important for making the bow look functional and powerful.
Lastly, the bowstring. This is a thin, straight line that connects the very tips of the two shoulders. When the bow is at rest, the string will be taut but not overly tight. When it's drawn back, the string will be pulled away from the bow's curve, creating a lot of tension. Drawing this line precisely and making sure it looks stretched can really show the bow's readiness for action. It's a subtle detail, yet it communicates a lot about the bow's potential, that.
How Can You Make Your Bow Drawings Stand Out?
Once you have the basic shapes down for either type of bow, you can start thinking about those "cool tricks" that make your drawing look "super awesome," whether you want it to appear real or just incredibly stylish. One way to do this is by adding a little bit of shading. Shading can give your bow a sense of three dimensions, making it pop off the page instead of looking flat.
For a fabric bow, you might add soft shadows where the ribbon folds over itself or where one loop overlaps another. This creates a feeling of depth and softness. For a traditional bow, shading can help define the curve of the wood or the texture of the hilt. Think about where a light source might be coming from, and then add darker tones to the areas that would be in shadow. This simple step can really make your bow seem more solid and present, very much so.
Adding Those Special Touches to How to Draw a Bow
Another way to make your bow drawings special is by thinking about texture. If it's a fabric bow, perhaps it's made of satin, which would have a smooth, reflective quality, or maybe burlap, which would be rougher. You can suggest these textures with your pencil strokes. For a traditional bow, the wood might have a grain, or the hilt might be wrapped in leather. Adding small lines or patterns can hint at these different surfaces, which is quite clever.
You can also play with perspective. Instead of always drawing your bow straight on, try drawing it from a slight angle, or as if it's tied to something. This can add a lot of visual interest and make your drawing feel more dynamic. Even just a little tilt can change the whole feel of the piece, you know? Experimenting with different angles is a great way to push your creative boundaries a little bit.
Finally, don't be afraid to add your own personal flair. If you want your bow to look "super cool" rather than super realistic, you can exaggerate certain features, use bold outlines, or even add decorative elements like dots, stripes, or patterns to the ribbon or the bow itself. Your drawing is your own creation, so feel free to make it truly yours. It's about having fun with the process, after all, and letting your imagination guide you.
This guide has covered how to draw both decorative ribbon bows and traditional weapon bows, breaking down the steps for each. We looked at starting with basic shapes for fabric bows, adding details like folds and texture, and then explored the distinct parts of a classic archery bow, including the hilt, shoulders, and bowstring. We also touched on ways to make your drawings more engaging, such as using shading, suggesting textures, and experimenting with perspective to give your bows more character.
Related Resources:
Detail Author:
- Name : Lora Graham
- Username : madyson20
- Email : darrick24@cassin.com
- Birthdate : 1999-10-17
- Address : 59625 Balistreri Highway Justynville, MO 45648
- Phone : +1 (269) 237-1547
- Company : Durgan, Yundt and Schulist
- Job : Occupational Therapist
- Bio : Officiis magnam ad eum esse. Incidunt beatae tempora est autem velit. Iure dolorem voluptas laboriosam voluptatem. Sunt velit est laborum et eum. Harum ea molestiae qui repudiandae.
Socials
linkedin:
- url : https://linkedin.com/in/rashawn.bashirian
- username : rashawn.bashirian
- bio : Aut ab velit nihil aut tenetur sapiente.
- followers : 1379
- following : 1017
instagram:
- url : https://instagram.com/bashirian2013
- username : bashirian2013
- bio : Excepturi totam velit quo corporis et. Debitis possimus voluptatem rerum nisi ut iste.
- followers : 2155
- following : 1202
